The MyLibrary screen comprises of a Style Tree , PFL Player , Cart Bulker and the main Viewer Grid. When viewing a list, most of the routines can be started by selecting the items to change using CTRL/SHIFT and the left mouse button followed by a right-click to select the appropriate Export option.
Populating the main viewer is simply a matter of dragging a top-level folder or file/s from any "Explorer" (folder) window, loading an M3U playlist or entering/browsing a folder at the top of the screen.

Load
Folder / Folder Tree View
Using the Configuration, you can define a series
of preset "favourite" folders for instant recall, or, you can click the "..."
button to display the Folder Tree View which allows you to navigate
folders/drives and find a directory to load into MyLibrary. Clicking the
"..." button will toggle the Tree View on/off. Double-clicking a folder
will load it into MyLibrary.
Viewer
This is the main
list view that shows the audio tracks - it has a number of columns which relate
to various meta-data fields, eg: Artist, Title, Year, Duration, Style, ISRC,
FileName, Cue Points and so on... Columns can be re-sized and re-arranged
to suit your preference.
How to Populate the List:
-
Type a folder location into the textbox and click "Load Folder"
-
Click the ... button to invoke the file-browser "tree", navigate to and double-click the folder you wish to load
-
Open and M3U/Text file of contents
-
Drag and drop audio files into the window
-
Drag a single folder into the window - this can either clear the existing contents or append to build a large list of different folders
When you load a folder, M3U file or drag 'n' drop from Windows, the information will be read according to the Read settings in the Config - JMD stores everything - and is preferred. This allows you to easily match-up duplicate filenames to identify duplicate files (useful if you are importing lots of compilation albums where overlaps are possible).
IMPORTANT! Any changes made to tracks using the Mass Changer are NOT saved, unless the Database is enabled, until you Export to your chosen file/tag format - This can be useful if you wish to make a temporary change (such as a re-numbering of Carts for a 2nd station) but wish to retain your own settings.
Durations are 0 on new items (unless you set the "Get Durations" option in the Configuration ) until you set a Segue point - this is to easily show which audio files have been "processed" by you.
See the Library Actions section for details on what you can do with a list of tracks.
The Playout Export... menu allows for quick-access to the professional playout system exports but is also available via a right-click.
Database
Search
You can select the column/field to search in plus
include/exclude items without a Cart Number. The text search is not
case-sensitive and is a "contains" than than "exact match" search. So if
you type CLA then results will include CLASH, CLASSICAL etc. If
you select ReleaseYear and search for 201 then all tracks
2010-2019 will be found.
When you select either Album or MediaRef from the dropdown box, the Style Tree reverts to a list and loads all Albums/MediaRef entries in your Database allowing you to quickly see what titles you have - clicking an entry will list all matching results. Selecting "Station" will populate the list with those defined in the Configuration .
The QuickFind is an additional window that allows you to perform additional searches (and selecting results based on a Cart range) for adding into the main list view, such as building a list of items to work on.

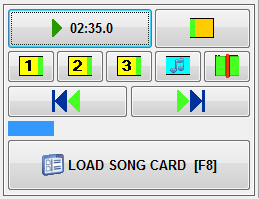
Preview Player
Plays the currently selected item from the list (or QuickFind window)-
you can also jump to Intro 1/2/3, Hook and Segue points plus End
Mon (end-of-file recap).
The progress bar can be dragged to a particular
point in the track while holding down the left mouse
button.
Clicking the Seek
buttons while holding CTRL will double
the increment value.
Style Tree - Filtering
by ItemType and Style
Filtering a list of songs
allows you to choose to view only the tracks within a given Category/Genre/Style.
This allows you to easily see how many you have, check if they need more details
entering - or just to export the data to M3U, CSV or one of the playout formats.
The ItemType is also part of the filter, so if you have THEME as both JINGLE and SONG Styles, you will only see the items falling under that particular ItemType. To find *ALL* items with THEME in the Style, select "Style" from the "Search Column/Field" dropdown and type THEME in the "Search for.." box.
Click the desired Style, and MyLibrary will re-populate the main list with those tracks matching the selected Style. If you hold down CTRL while clicking the Style, items NOT matching the selection will be filtered, eg: if you CTRL+click "POP", all items that are NOT POP will show in the Filter View.
This filtered list is shown with blue text to denote that you are using the "filtered view".
Important! The Genre/Style tree will perform a database lookup if the "Database Search" fields are visible (this switches with the Folder preset dropdown), otherwise it will process the current view/folder of files.
Top
Tip!
If you wish to filter via TWO
Category/Genre/Style values, you can use the Database search bar for the 1st
query, then click the "Show Folder Presets" button which will hide the
search bar and revert back to the Folder Presets... However, this will also set
the Style Tree to apply a filter on the current list contents rather
than a Database query.
eg: Select "Style" in the "Search Column/Field" dropdown and type a name, then click the "Show Folder Presets" button. You can then click (or CTRL-click to invert the filter) an entry from the Style Tree to (not) filter via that 2nd Style. So you could search for items that are "POP" and then use the Style tree to filter those results are not DANCE.
Top
Tip!
If you are
looking at compilation CDs and wish to see if you already have the songs,
copy+paste the Artist+Titles into a new text file constructing a simple M3U
using the path and extension, then load it into MyLibrary - any matching
filenames (regardless of path) will automatically populate from the JMD files
you already have.
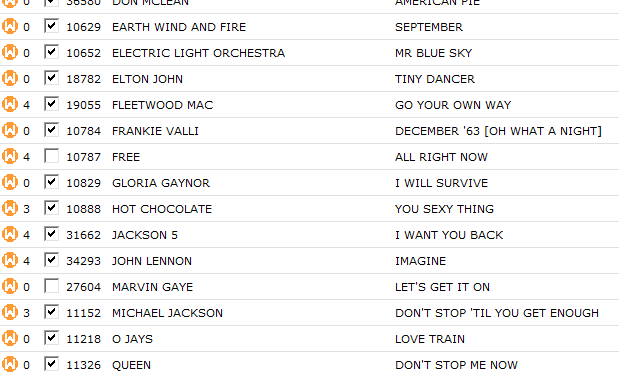
Here's an example from my own collection here I've loaded Now That's What I Call 70s into the list - All are duplicates, but a couple of tracks (All Right Now and Let's Get It On) only exist in MP3 form, so those tracks will be kept.
Load Tabbed Text File
Will read back into MyLibrary a set of values from
a Tab (or other delimiter) Text File
for further processing. This will populate
the fields entirely from the text file and ignore any Database
or Tagging formats.
Both the "Load" and the "Merge" operations do not require any specific order of fields, so long as the FileName is present (to match the item) plus whatever fields you wish to load/merge. Cue-points must be in milliseconds, there is no numeric conversion from other formatting.
Merge Tabbed Text File
As above but will use the existing list
(loaded via search, folder or drag'n'drop etc) of selected item/s to slipstream
values into the list. This process requires a matching Path+FileName plus
whatever fields you wish to
overwrite.
Example : You may have a list of Years that you wish to update into the Database, so you would need a 2-column text-file containing fields for ReleaseYear and FileName .
Only the required "change" fields are needed for the text-file. Also, you can leave blank entries in some lines where you want the existing field to be preserved, so if you have missing fields in the text-file, but MyLibrary has a value - the MyLibrary value will be retained.
Column/Field Names :
Artist, Title, CueIn, Intro, Intro2, Intro3, Segue,
Duration, ReleaseYear, ItemType, Style, Opener, EndType, Gender, Tempo, LastPlayed, MediaRef, Track, FileName, Comment, ID, ISRC,
HookIn, HookOut, Modified, OriginalPath, Artists, RelatedArtists, Sweeper, WasMP3, BPM, StartDate, KillDate, Customer, DuckIn,
DuckOut, Rating, Album, FadeAll, BackupPath, Mood, Custom, Station, Show, Publisher, Composer,
RecordLabel, ClientID, AccountManager
Reload List using current "Read"
Method
This is useful if you wish to
update Database items with new "tag" content but do not want to load lots of folders of audio (or drag
them in) simply to get the files. Just search for the tracks, or add using
the QuickFind, then select this menu option and it will repopulate the list
(based on their filenames) with the current read format, eg: JMD,
ID3v2, CartChunk etc.
Scenario : You have 10 songs (which are in the Database) that have been tagged with new information but only to JMD - the Database search is producing "old" data. Re-reading the current list allows you to refresh it with whatever information is present in the current "Read" format. You can then update the Database with this information.
This operation can also act as a fail-safe during a Mass Change operation that has saved new information to the Database by mistake - You can "re-read" the JMD information as a form of "undo".
PasteList
This window allows you
to select items from the main window and use CTRL-V to "paste" the
Artist, Title and FileName into a list. An M3U (path\filename) export file can
then be created. This permits easy creation of dedicated audio
lists that may contain files from many Genres/Styles.